Blog-Archiv

Donnerstag, 17. Oktober 2024

Granny Square


Granny Square


Dies Granny Squares findest du alle auf diesem Blog ( Label: Granny Square )


Geschichte und Entwicklung bis heute

Der Granny Square, auch als „Omas Quadrat“ bekannt, ist ein gehäkeltes Quadratmuster, das Generationen von Handarbeitern fasziniert hat. Es ist ein Symbol für Gemütlichkeit, Tradition und Kreativität, das nicht nur Decken, sondern auch moderne Mode- und Wohnaccessoires schmückt. In diesem Artikel tauchen wir tief in die Geschichte des Granny Squares ein und beleuchten seine Entwicklung bis heute.

Ursprung des Granny Squares

Die genaue Entstehung des Granny Squares ist schwer zu datieren, doch es wird angenommen, dass es seine Wurzeln in der viktorianischen Zeit des 19. Jahrhunderts hat. Häkeln, wie wir es heute kennen, verbreitete sich in Europa und Nordamerika. Das Granny Square wurde wahrscheinlich als eine einfache und effiziente Methode entwickelt, um Garnreste zu verarbeiten und gleichzeitig farbenfrohe, funktionale Textilien zu erschaffen. Diese kleinen Quadrate ließen sich leicht transportieren, und einzelne Stücke konnten zu größeren Projekten zusammengenäht werden, was es ideal für Gemeinschaftsprojekte und Wohltätigkeitsarbeit machte.

Der Granny Square als Symbol der Nachhaltigkeit

Besonders in Zeiten von Knappheit, wie während der Weltkriege und der Großen Depression, erlebte das Granny Square eine Blütezeit. Garnreste, die zu schade zum Wegwerfen waren, wurden kreativ verwendet, um Decken, Schals oder andere wärmende Accessoires zu kreieren. So wurde der Granny Square nicht nur zu einem Zeichen von Sparsamkeit, sondern auch zu einem Symbol für nachhaltiges Handarbeiten. Der Gedanke, Material zu recyceln und dabei etwas Schönes und Nützliches zu schaffen, bleibt bis heute aktuell.

Popkultur und der Granny Square

In den 1960er- und 1970er-Jahren erlebte der Granny Square eine wahre Renaissance, vor allem in der Hippie-Ära. Die farbenfrohen, verspielten Quadrate fanden ihren Weg in die Mode, und bald sah man Granny-Square-Westen, Jacken und sogar Badeanzüge auf den Straßen. Berühmte Designer und Stars trugen dazu bei, dass das Granny Square wieder populär wurde. Besonders in den USA war das Muster ein Sinnbild für das selbstgemachte, kreative Lebensgefühl der Zeit.

Granny Square im 21. Jahrhundert

Mit der wachsenden Popularität von DIY-Projekten und dem Wiederaufleben traditioneller Handarbeitstechniken in den letzten Jahren, hat auch der Granny Square einen erneuten Aufschwung erlebt. Moderne Häkeldesigner nutzen das traditionelle Muster, um innovative und überraschende Stücke zu schaffen – von Decken über Taschen bis hin zu Wohnaccessoires. Dank der sozialen Medien gibt es heute unzählige Tutorials, Ideen und Projekte rund um das Granny Square. Es hat sich von einem einfachen Resteverwertungsmuster zu einem festen Bestandteil moderner Handwerkskunst entwickelt.

Die Vielseitigkeit des Granny Squares

Was das Granny Square besonders auszeichnet, ist seine Vielseitigkeit. Es kann in nahezu jeder Größe, Farbe und Material gehäkelt werden, was endlose kreative Möglichkeiten bietet. Das klassische Muster besteht aus einer Reihe von Luftmaschen und Stäbchen, die kreisförmig in einem Quadrat angeordnet sind. Doch die moderne Interpretation hat das Muster in allen möglichen Formen und Stilen neu erfunden – vom minimalistischen Monochrom-Design bis hin zu komplizierten Mustern mit Blumen- und Sternmotiven.

Fazit

Das Granny Square ist mehr als nur ein Häkelmuster. Es steht für Gemeinschaft, Kreativität und Nachhaltigkeit. Seine lange Geschichte zeigt, wie ein einfaches Quadrat Generationen von Handwerkern inspiriert hat und sich immer wieder neu erfindet. Von seiner Entstehung als Resteverwertungsmethode bis hin zu seiner Rolle in der modernen Handwerkskultur – das Granny Square bleibt ein Klassiker, der nie aus der Mode kommt. Es ist ein lebendiges Zeugnis dafür, wie Tradition und Innovation im Handwerk zusammenkommen.

Dienstag, 15. Oktober 2024

Christmas Decorations: Crochet bells for the Festive Season ( englisch )

Crochet Your Own Christmas Decorations

 Bells for the Festive Season

With Crochet Pattern

The Advent season is the perfect time to decorate your home and express your creativity. What could be better than decorating the Christmas tree with handmade ornaments? Crocheted bells not only add a nostalgic and warm touch to the tree but also make every decoration a unique piece of art. In this article, I’ll show you how to easily and stylishly crochet your own bells – a fun project that adds a personal touch to your holiday festivities.

Why Crochet Bells?

Crocheted bells are a timeless classic. They bring traditional craftsmanship to modern holiday decorations, combining nostalgic memories with contemporary creativity.

  • Handmade Details: Each piece is unique and showcases attention to detail.
  • Sustainability: You can use eco-friendly materials like organic cotton or recycled yarn.
  • Versatile Use: These crocheted bells can be used not only as Christmas tree ornaments but also as festive gift tags or to decorate windows and Advent wreaths.

Creative Ideas for Your Crocheted Bells

  • Color Combinations: Use different yarn colors to give your bells a special look – for example, red and white for a classic Christmas vibe or metallic tones for a glamorous effect.
  • Pattern Variations: Incorporate simple patterns like double crochet or picots to add more detail to the bells.
  • Mini Bells as Gift Tags: Crochet small bells and use them as creative tags for Christmas presents.

Conclusion: Crochet Bells for a Personalized Holiday Decoration

Crocheted bells are a wonderful way to give your home a personal and unique holiday look. Crocheting them is not only a relaxing activity during the hectic Christmas season but also makes a special gift for friends and family. They will surely appreciate the lovingly crafted decorations – and you’ll be proud of your handmade masterpieces.

Why not get started right away? The joy of Christmas begins with the crocheting!


Materials for Crocheted Christmas Bells

Before we begin, you’ll need just a few simple materials:

  • Crochet hook (usually size 2.5 to 3.5 mm, depending on yarn thickness)
  • Yarn (cotton or metallic yarn to give the bells a festive shimmer)
  • Stuffing (optional, for a firmer appearance)
  • Scissors and tapestry needle

Instructions: How to Crochet Bells

Here’s a simple step-by-step guide for your crocheted Christmas bells:

Bell (make 2)

Color: Yellow, Red, or Blue

  • Round 1: 6 single crochets (sc) in a magic ring (6)
  • Round 2: Double each stitch (12)
  • Round 3: 1 sc, increase in next stitch repeat 5 times (18)
  • Rounds 4-6: 18 sc (18)
  • Round 7: 5 sc, increase repeat 2 times (21)
  • Rounds 8-11: 21 sc (21)

Stuff the bell with fiberfill up to round 9.

  • Round 12: 6 sc, increase repeat 2 times (24)
  • Round 13: 3 sc, increase repeat 5 times (30)
  • Round 14: Crochet in the back loop only, 30 sc (30)
  • Round 15: 3 sc, decrease repeat 5 times (24)
  • Rounds 16-17: 24 sc (24)
  • Round 18: 2 sc, decrease repeat 5 times (18)
  • Round 19: 18 sc (18)
  • Round 20: 1 sc, decrease repeat 5 times (12)
  • Round 21: Decrease 6 times (6)
  • Round 22: Skip 1 stitch, slip stitch in next stitch repeat 2 times (3)

Finish and weave in the yarn end. Fold rounds 15-22 inward to form the bell shape.

Clapper:

Color: Gold

Work in spiral rounds.

  • Round 1: 6 sc in a magic ring (6)
  • Round 2: Double each stitch (12)
  • Rounds 3-4: 12 sc (12)
  • Round 5: Decrease 6 times (6)
  • Rounds 6-8: 6 sc (6)

Finish and leave a long tail to sew the clapper inside the bell.

Attaching the Hanger:

Crochet a small chain and attach it to the top of the bell as a hanger. This way, you can easily hang your bells on the Christmas tree or tie them to gifts.

Enjoy making these festive, personal decorations!

Sonntag, 13. Oktober 2024

55 Weihnachtsschmuck selber häkeln: Glocke

 Weihnachtsschmuck selber häkeln.

Glocken für die festliche Zeit selbst häkeln

Mit Häkelanleitung


DIY gehäkelte Amigurumi Weihnachtsglocken – Festlicher, handgemachter Schmuck für den Christbaum und Geschenke. Mit kostenlose Anleitung
Weihnachtsglocken gehäkelt


Die Vorweihnachtszeit ist die perfekte Gelegenheit, das Zuhause festlich zu schmücken und die kreative Ader auszuleben. Was gibt es Schöneres, als den Christbaum mit selbstgemachtem Weihnachtsschmuck zu dekorieren? Selbstgehäkelte Glocken verleihen dem Weihnachtsbaum nicht nur eine nostalgische und warme Note, sondern machen jede Dekoration zu einem individuellen Kunstwerk. In diesem Artikel zeige ich dir, wie du einfach und stilvoll Glocken selber häkeln kannst – ein Projekt, das Spaß macht und dem Weihnachtsfest eine persönliche Note verleiht.


Warum gehäkelte Glocken?

Selbstgehäkelte Glocken sind ein zeitloser Klassiker. Sie bringen handwerkliche Tradition in die moderne Weihnachtsdekoration und verbinden nostalgische Erinnerungen mit moderner Kreativität.

  1. Handgemachte Details: Jedes Stück ist einzigartig und zeigt Liebe zum Detail.
  2. Nachhaltigkeit: Du kannst nachhaltige Materialien wie Bio-Baumwolle oder recyceltes Garn verwenden.
  3. Vielfältige Verwendung: Die gehäkelten Glocken eignen sich nicht nur als Christbaumschmuck, sondern auch als festliche Anhänger für Geschenke oder zur Dekoration von Fenstern und Adventskränzen.

Kreative Ideen für deine gehäkelten Glocken

  • Farbwechsel: Verwende unterschiedliche Garnfarben, um deinen Glocken einen besonderen Look zu verleihen – zum Beispiel Rot und Weiß für eine klassische Weihnachtsstimmung oder Metallic-Töne für einen glamourösen Look.
  • Muster variieren: Du kannst einfache Muster wie Stäbchen oder Picots einbauen, um die Glocken noch detailreicher zu gestalten.
  • Kleine Glocken als Geschenkanhänger: Häkle Mini-Glocken und verwende sie als kreative Anhänger für Weihnachtsgeschenke.


Fazit: Glocken häkeln für eine persönliche Weihnachtsdeko

Selbstgehäkelte Glocken sind eine wunderbare Möglichkeit, dein Zuhause in der Weihnachtszeit persönlich und einzigartig zu gestalten. Das Häkeln der Glocken ist nicht nur eine entspannende Tätigkeit in der hektischen Adventszeit, sondern auch ein besonderes Geschenk für Freunde und Familie. Sie werden den liebevoll gestalteten Weihnachtsschmuck zu schätzen wissen – und du wirst stolz auf deine handwerklichen Meisterwerke sein.

Warum nicht gleich damit beginnen? Die Vorfreude auf das Weihnachtsfest beginnt schon beim Häkeln!

Materialien für gehäkelte Weihnachtsglocken

Bevor wir mit dem Häkeln beginnen, brauchst du nur wenige einfache Materialien:

  • Häkelnadel (meistens Größe 2,5 bis 3,5 mm, je nach Garnstärke)
  • Garn (Baumwollgarn oder Glitzergarn, um den Glocken einen festlichen Glanz zu verleihen)
  • Füllwatte (optional, für ein festeres Aussehen)
  • Schere und Stopfnadel

Häkelanleitungen nach diesem Beitrag.

Donnerstag, 10. Oktober 2024

Simple Irish Wheel ( englisch )

Simple Irish Wheel

With Crochet Pattern

Discover the Versatility of the Simple Irish Wheel in Crochet

Irish crochet is a fascinating technique known for its intricate and delicate patterns. The simple Irish wheel is a fantastic project for those looking to try their hand at this art form. In this blog post, you'll learn more about the versatility of the simple Irish wheel, its applications, and why it’s a wonderful addition to your crochet projects.

What is a Simple Irish Wheel?

The simple Irish wheel is a classic crochet motif often found in Irish lace crochet. It consists of a central round shape surrounded by delicate, wheel-like patterns. This timeless design is both elegant and versatile, and it can be used in a wide variety of projects.

Versatile Applications

Fashion Accessories

The simple Irish wheel can be used to create beautiful fashion accessories. It’s perfect for delicate scarves, elegant neckerchiefs, or even as decorative elements on hats and beanies. Combine multiple Irish wheels to create unique and stylish pieces that are sure to turn heads.

Home Textiles

The simple Irish wheel brings a touch of elegance to your home. Use it as a decorative element for pillow covers, table runners, or even curtains. The intricate details and delicate pattern add a luxurious feel to your home textiles, giving any room a refined touch.

Wedding Decorations

Irish crochet lace is particularly popular for wedding decorations. The simple Irish wheel can be used as a charming element in bridal veils, table decorations, or even as tags for guest favors. The delicate beauty of this motif makes it perfect for special occasions, creating a romantic atmosphere.


Easy Instructions and Tips

Material Selection

For the simple Irish wheel, you'll need fine cotton yarn and a matching crochet hook. Fine yarn helps to highlight the delicate details of the pattern, resulting in an elegant finish.

Crochet Techniques

The simple Irish wheel requires basic crochet techniques such as chain stitches, single crochet, and double crochet. With a little practice, you'll quickly master this beautiful pattern.


Conclusion

The simple Irish wheel is a versatile and elegant crochet motif, perfect for a variety of projects. Whether it's fashion accessories, home textiles, or wedding decorations, the possibilities are endless. Dive into the world of Irish crochet and discover the joy of creating this timeless pattern.

Download the free PDF tutorial and follow my blog for more crochet patterns and tips! Feel free to leave your comments and share your experiences with Irish crochet. Your feedback is important and helps improve the blog. Thank you for your support and happy crocheting!


Crochet Pattern Instructions

I used three colors, though Irish crochet is often done in a single color.

With white yarn, make a ring with 5 chains and 1 slip stitch.


Round 1 (White)
12 single crochets into the ring, close the round with a slip stitch in the first stitch.


Round 2
In each stitch: 1 double crochet cluster + 3 chains. Replace the first double crochet with 3 chains. Close the round with a slip stitch in the first double crochet.


Round 3 (Pink)
In each chain space: 1 double crochet cluster + 6 chains. Replace the first double crochet with 3 chains. Close the round with a slip stitch in the first double crochet.


Round 4 (Light Red)
In each chain space, crochet 7 single crochets. Close the round with a slip stitch in the first stitch.


Crocheting a Cluster Stitch means you gather multiple double crochets on your hook and join them together at the top. There are two different methods to crochet cluster stitches. You can either crochet the stitches all into one or into multiple insertion points.


DC Cluster = Double Crochet Cluster Stitch

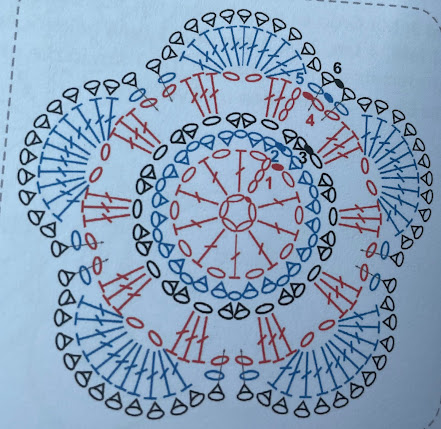
Crocheted Small Flower in Irish Crochet Style ( englisch )


Crocheted Small Flower in Irish Crochet Style – Versatile Decoration Ideas

With Crochet Pattern


Introduction

Welcome to my blog! Today, I want to introduce you to small flowers in the Irish crochet style. These charming blooms are not only a great project for crochet lovers but also incredibly versatile. Whether as decoration for clothing, pillows, coasters, or even jewelry – the possibilities are endless. Learn how to crochet these delightful flowers and where you can use them!

Materials (e.g.):

  • Yarn: Cotton yarn (depending on the desired size of the flower)
  • Crochet hook: Size 1.5 mm to 3.5 mm
  • Scissors
  • Yarn needle

You can find the full instructions on my blog. Here's an overview of the steps:

  1. Create a magic ring.
  2. Petals: Crochet in rounds using a combination of chain stitches, single crochets, and double crochets.
  3. Finishing: Weave in the ends and block the flower.

Creative Application Ideas

Fashion and Accessories

  • Clothing: Add a personal touch to your garments. Sew the crocheted flowers onto jackets, sweaters, t-shirts, or hats.
  • Bags: Embellish handbags and backpacks with the pretty flowers. They make any accessory stand out.
  • Hats: Attach the flowers to hats for a romantic and playful look.

Home and Everyday Décor

  • Pillows: Decorate your pillows with crocheted flowers for a cozy and elegant touch.
  • Coasters: These flowers make for very decorative coasters.
  • Table runners: Combine multiple flowers into a beautiful table runner or doily.

Jewelry

With very thin yarn and a fine crochet hook, you can even create delicate jewelry like earrings, necklaces, and bracelets. These are not only unique but also perfect gifts.

Tips for the Perfect Flower

  • Yarn thickness and hook size: The size of the crocheted flower depends on the yarn thickness and hook size. The thinner the yarn and finer the hook, the smaller and more delicate the flower will be.
  • Colors: Experiment with different colors to create interesting effects.
  • Quality: Use high-quality yarn for durable and beautiful results.

Follow my blog for more creative inspiration!

If you enjoyed this tutorial and want to discover more creative crochet ideas, follow my blog and social media channels! I regularly share new projects, helpful tips and tricks, as well as detailed tutorials. Let's experience the joy of crafting together and create beautiful handmade pieces.

With this guide and the versatile application ideas, you can let your creativity run wild and take your crochet art to the next level. Happy crocheting!


Crochet Pattern

Using 3 colors, which can be varied.

With color A, crochet a ring of 6 ch and join with a sl st.

Round 1:

Ch 3 into the ring (this counts as 1 dc + 1 ch), 1 dc + 1 ch 9 more times into the ring. Close the round invisibly into the 1st dc.

Round 2 (Color B):

Attach yarn in any ch-space and start with a standing sc. Crochet 2 sc + 1 ch in each ch-space. Fasten off and close the round invisibly into the 1st sc.

Round 3 (Color C):

Attach yarn and crochet 2 sc + 1 ch in each ch from the previous round. Fasten off and close the round invisibly into the 1st sc.

Round 4 (Color A):

Attach yarn in a ch-space and start with a standing sc. In each ch-space, crochet 3 dc + 1 ch. The first dc is replaced by ch 3. Fasten off and close the round invisibly into the 1st dc.

Round 5 (Color B):

Attach yarn in any ch-space and start with a standing sc. Crochet 1 ch + 11 dc + 1 ch in each ch-space. Fasten off and close the round invisibly into the 1st ch.

Round 6 (Color C):

Crochet 1 sc on top of each dc, and around the ch from rounds 4 + 5, crochet 2 deep sc. Fasten off and close the round invisibly into the 1st sc


Donnerstag, 26. September 2024

Crochet Tulips (Englisch)

Handmade Crochet Tulips for Your Home.

With Crochet Pattern


Welcome the spring with handmade crochet tulips! Learn how you can add a fresh touch of spring to your home with handcrafted yarn decorations. Perfect for creative decor ideas and unique gifts.

Welcome Spring with Crochet Tulips: Handmade Decorations for Your Home
Spring is just around the corner, and what better way to welcome it than with homemade decorations? Discover the charming idea of creating crochet tulips that will beautify your home and bring a fresh touch of spring to your windows.
A Touch of Spring
As the first warm spring days arrive, not only does nature awaken, but so does our creative side. It’s the perfect time to revitalize your home with handcrafted details and fresh colors. Crochet tulips are the ideal way to bring spring indoors and add a lively flair to any room.
Crafted with Love
Each crochet tulip is lovingly and carefully handmade. From selecting the yarns to finishing the last stitch, our heart goes into every piece. This dedication gives the tulips a special character, making them unique decorations for your home.
Creative Decoration Ideas
The versatility of crochet tulips knows no bounds. Whether as single flowers in a lovely vase arrangement or as a colorful bouquet, they’re sure to catch everyone’s eye. Use them as window decorations by hanging them with a pretty ribbon or attaching them directly to the curtains.
Unique Accents
What makes crochet tulips so special is their uniqueness. Each flower is a one-of-a-kind creation. They make the perfect gift for friends and family or a personal treat just for you.
Conclusion
With handmade crochet tulips, you can instantly bring a touch of spring to your home. Their loving craftsmanship, creative versatility, and unique personality make them an irresistible decor idea for any home. So grab your crochet hook and let your creative side bloom!
If you like my blog, I would be very happy if you follow it. Your feedback and comments are always welcome!


And here’s how to crochet them:

Crochet Instructions:

Flower: any color
Start with a double magic ring and work in spiral rounds.

Tip: Always mark the first stitch. I always use a thread.

Round 1:
Crochet 12 single crochet into the magic ring
(12)

Round 2:
(1 single crochet increase, 1 single crochet) x6
(18)

From Round 3 onwards, crochet twisted single crochets.
Round 3:
(1 single crochet increase, 2 single crochet) x6
(24)

Round 4:
24 single crochet
(24)

Round 5:
(1 single crochet increase, 7 single crochet) x3
(27)

Round 6:
27 single crochet
(27)

Round 7:
(1 single crochet increase, 8 single crochet) x3
(30)

Round 8:
30 single crochet
(30)

Round 9:
(1 single crochet increase, 9 single crochet) x3
(33)

Round 10:
33 single crochet
(33)

Round 11:
(1 single crochet increase, 10 single crochet) x3
(36)

Round 12:
36 single crochet
(36)

Round 13:
36 single crochet
(36)

Round 14:
(1 single crochet increase, 11 single crochet) x3
(39)

Round 15:
39 single crochet
(39)

Round 16:
(1 single crochet increase, 12 single crochet) x3
(42)

Round 17:
42 single crochet

(1 single crochet decrease, 7 single crochet) x3
(42)

Round 18:
This round consists of 6 slip stitches. Crochet 1 slip stitch in every 7th stitch. Stuff with fiberfill after the third slip stitch. Finish by weaving in the threads and shaping the flower.

Stem: green color
Wrap 3 wooden skewers with green yarn. Start with a secure loop at the pointed end. Secure the yarn between the sticks at the other end.
Insert the tip of this stem about 1-2 cm into the magic ring of the flower and sew it tightly with thin yarn.


Leaf: green color
Work in spiral rounds again.
Remember to mark the beginning of each round.

Round 1:
6 single crochet into a magic ring
(6)

Round 2:
(1 single crochet increase, 2 single crochet) x2
(8)

Round 3:
8 single crochet
(8)

Round 4:
(1 single crochet increase, 3 single crochet) x2
(10)

Rounds 5 & 6:
10 single crochet
(10)

Round 7:
(1 single crochet increase, 4 single crochet) x2
(12)

Rounds 8 & 9:
12 single crochet
(12)

Round 10:
(1 single crochet increase, 3 single crochet) x3
(15)

Rounds 11 & 12:
15 single crochet
(15)

Round 13:
(1 single crochet increase, 4 single crochet) x3
(18)

Round 14:
18 single crochet
(18)

Round 15:
(1 single crochet increase, 5 single crochet) x3
(21)

Rounds 16 & 17:
21 single crochet
(21)

Round 18:
(1 single crochet increase, 6 single crochet) x3
(24)

Rounds 19 & 20:
24 single crochet
(24)

Round 21:
(1 single crochet increase, 7 single crochet) x3
(27)

Rounds 22-31:
27 single crochet
(27)

Round 32:
(1 single crochet decrease, 7 single crochet) x3
(24)

Rounds 33 & 34:
24 single crochet
(24)

Round 35:
(1 single crochet decrease, 6 single crochet) x3
(21)

Rounds 36 & 37:
21 single crochet
(21)

Round 38:
(1 single crochet decrease, 5 single crochet) x3
(18)

Rounds 39-49:
18 single crochet (11 rounds)
(18)

Round 50:
Fold the leaf together (with very soft yarn, you can cut out a leaf from plastic and insert it into the crochet leaf) and crochet the opposite stitches together.
(8 stitches) and the last stitch is a slip stitch. Cut the yarn, leaving about 10 cm.

Sew the leaf securely around the stem with the yarn.

Sonntag, 25. August 2024

54 Sammlung: Gladiole; Magerite; Irisblüte; Tulpe;

 Sammlung: Amigurumi Gladiole, Margerite, Iris und Tulpe

Mit Häkelanleitungen

Amigurumi: Gladiole


Eine Sammlung von Amigurumi Gladiole, Margerite, Iris und Tulpe.mit Kostenosen Anleitungen
Amigurumi: Gladiole

Amigurumi Gladiole häkeln: Ein zauberhaftes Handarbeitsprojekt

Willkommen auf meinem Blog! Heute möchte ich euch ein ganz besonderes Amigurumi-Projekt vorstellen: eine gehäkelte Gladiole. Diese wunderschöne Blume ist nicht nur ein tolles Geschenk, sondern auch eine zauberhafte Dekoration für dein Zuhause. Lass uns gemeinsam in die Welt des Amigurumi eintauchen und entdecken, warum diese gehäkelte Gladiole ein Muss für jeden Häkelfan ist.

Warum eine gehäkelte Gladiole?

Gladiolen sind prächtige Blumen, die für Stärke, Integrität und Erinnerung stehen. Eine gehäkelte Gladiole als Amigurumi-Figur kann all diese positiven Eigenschaften in dein Leben bringen. Ihre elegante Form und die leuchtenden Farben machen Gladiolen zu perfekten Motiven für Amigurumi-Projekte.

Der perfekte Blickfang für dein Zuhause

Eine Amigurumi-Gladiole ist eine wunderbare Dekoration für dein Zuhause. Platziere sie in einer Vase auf dem Esstisch, auf einem Regal oder einer Kommode. Ihre lebendige Erscheinung bringt Farbe und Frische in jeden Raum. Besonders in einem Wohnzimmer oder auf einem Fensterbrett sorgt eine gehäkelte Gladiole für eine liebevolle und warme Atmosphäre.

Individuelle Gestaltungsmöglichkeiten

Das Tolle an Amigurumi ist, dass du jedes Projekt nach deinen eigenen Vorstellungen gestalten kannst. Die Gladiole kann in verschiedenen Farben gehäkelt werden – von klassischen Rosa- und Weißtönen bis hin zu kräftigen, fröhlichen Farben wie Rot, Lila oder Gelb. Du kannst die Blüten auch mit Perlen oder Glitzer verzieren, um ihnen einen besonderen Touch zu verleihen. So wird jede gehäkelte Gladiole zu einem Unikat.

Ein wunderbares Geschenk

Handgemachte Geschenke sind immer etwas Besonderes. Eine gehäkelte Gladiole zeigt, dass du dir viel Mühe und Zeit genommen hast, um etwas Einzigartiges zu schaffen. Ob zum Geburtstag, zu Weihnachten oder als kleines Dankeschön – eine Amigurumi-Gladiole zaubert jedem ein Lächeln ins Gesicht. Besonders für Blumenliebhaber und Häkelfans ist dies ein außergewöhnliches Geschenk, das von Herzen kommt.

Die Freude am Häkeln

Eine Amigurumi-Gladiole ist nicht nur ein schönes Endprodukt, sondern auch ein erfüllendes Handarbeitsprojekt. Das Häkeln dieser Blume kann eine entspannende und kreative Auszeit vom Alltag sein. Egal, ob du Anfänger oder fortgeschrittener Häkler bist, das Arbeiten an dieser Gladiole wird dir Freude bereiten und deine Fähigkeiten weiterentwickeln.

Fazit

Eine Amigurumi-Gladiole ist mehr als nur eine Dekoration. Sie ist ein Ausdruck von Kreativität, Handwerkskunst und Liebe zum Detail. Ob für dich selbst oder als Geschenk für jemanden Besonderen – diese gehäkelte Gladiole bringt Freude und einen Hauch von Magie in jeden Haushalt.

Folge meinem Blog für weitere Häkelprojekte und inspirierende Ideen! Wenn du deine eigenen gehäkelten Gladiolen oder andere Amigurumi-Figuren teilen möchtest, hinterlasse gerne einen Kommentar. Ich freue mich immer über eure kreativen Beiträge und Anregungen. Vielen Dank für deine Unterstützung und viel Spaß beim Häkeln!

Häkelanleitungen nach diesem Beitrag.

86. Amigurumi: Kaktus rund und lang

Amigurumi: Kaktus rund und lang   Gehäkelte Kakteen: Pflegeleichte Deko für dein Zuhause Zimmerpflanzen bringen Frische und Gemütlichkeit in...