Blog-Archiv

Posts mit dem Label Blossom werden angezeigt. Alle Posts anzeigen

Donnerstag, 10. Oktober 2024

Crocheted Small Flower in Irish Crochet Style ( englisch )


Crocheted Small Flower in Irish Crochet Style – Versatile Decoration Ideas

With Crochet Pattern


Introduction

Welcome to my blog! Today, I want to introduce you to small flowers in the Irish crochet style. These charming blooms are not only a great project for crochet lovers but also incredibly versatile. Whether as decoration for clothing, pillows, coasters, or even jewelry – the possibilities are endless. Learn how to crochet these delightful flowers and where you can use them!

Materials (e.g.):

  • Yarn: Cotton yarn (depending on the desired size of the flower)
  • Crochet hook: Size 1.5 mm to 3.5 mm
  • Scissors
  • Yarn needle

You can find the full instructions on my blog. Here's an overview of the steps:

  1. Create a magic ring.
  2. Petals: Crochet in rounds using a combination of chain stitches, single crochets, and double crochets.
  3. Finishing: Weave in the ends and block the flower.

Creative Application Ideas

Fashion and Accessories

  • Clothing: Add a personal touch to your garments. Sew the crocheted flowers onto jackets, sweaters, t-shirts, or hats.
  • Bags: Embellish handbags and backpacks with the pretty flowers. They make any accessory stand out.
  • Hats: Attach the flowers to hats for a romantic and playful look.

Home and Everyday Décor

  • Pillows: Decorate your pillows with crocheted flowers for a cozy and elegant touch.
  • Coasters: These flowers make for very decorative coasters.
  • Table runners: Combine multiple flowers into a beautiful table runner or doily.

Jewelry

With very thin yarn and a fine crochet hook, you can even create delicate jewelry like earrings, necklaces, and bracelets. These are not only unique but also perfect gifts.

Tips for the Perfect Flower

  • Yarn thickness and hook size: The size of the crocheted flower depends on the yarn thickness and hook size. The thinner the yarn and finer the hook, the smaller and more delicate the flower will be.
  • Colors: Experiment with different colors to create interesting effects.
  • Quality: Use high-quality yarn for durable and beautiful results.

Follow my blog for more creative inspiration!

If you enjoyed this tutorial and want to discover more creative crochet ideas, follow my blog and social media channels! I regularly share new projects, helpful tips and tricks, as well as detailed tutorials. Let's experience the joy of crafting together and create beautiful handmade pieces.

With this guide and the versatile application ideas, you can let your creativity run wild and take your crochet art to the next level. Happy crocheting!


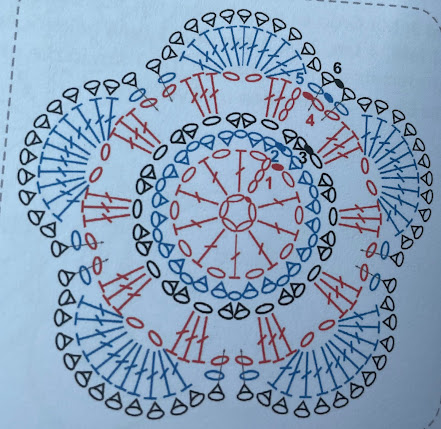
Crochet Pattern

Using 3 colors, which can be varied.

With color A, crochet a ring of 6 ch and join with a sl st.

Round 1:

Ch 3 into the ring (this counts as 1 dc + 1 ch), 1 dc + 1 ch 9 more times into the ring. Close the round invisibly into the 1st dc.

Round 2 (Color B):

Attach yarn in any ch-space and start with a standing sc. Crochet 2 sc + 1 ch in each ch-space. Fasten off and close the round invisibly into the 1st sc.

Round 3 (Color C):

Attach yarn and crochet 2 sc + 1 ch in each ch from the previous round. Fasten off and close the round invisibly into the 1st sc.

Round 4 (Color A):

Attach yarn in a ch-space and start with a standing sc. In each ch-space, crochet 3 dc + 1 ch. The first dc is replaced by ch 3. Fasten off and close the round invisibly into the 1st dc.

Round 5 (Color B):

Attach yarn in any ch-space and start with a standing sc. Crochet 1 ch + 11 dc + 1 ch in each ch-space. Fasten off and close the round invisibly into the 1st ch.

Round 6 (Color C):

Crochet 1 sc on top of each dc, and around the ch from rounds 4 + 5, crochet 2 deep sc. Fasten off and close the round invisibly into the 1st sc

Donnerstag, 26. September 2024

Crochet Tulips (Englisch)

Handmade Crochet Tulips for Your Home.

With Crochet Pattern


Welcome the spring with handmade crochet tulips! Learn how you can add a fresh touch of spring to your home with handcrafted yarn decorations. Perfect for creative decor ideas and unique gifts.

Welcome Spring with Crochet Tulips: Handmade Decorations for Your Home
Spring is just around the corner, and what better way to welcome it than with homemade decorations? Discover the charming idea of creating crochet tulips that will beautify your home and bring a fresh touch of spring to your windows.
A Touch of Spring
As the first warm spring days arrive, not only does nature awaken, but so does our creative side. It’s the perfect time to revitalize your home with handcrafted details and fresh colors. Crochet tulips are the ideal way to bring spring indoors and add a lively flair to any room.
Crafted with Love
Each crochet tulip is lovingly and carefully handmade. From selecting the yarns to finishing the last stitch, our heart goes into every piece. This dedication gives the tulips a special character, making them unique decorations for your home.
Creative Decoration Ideas
The versatility of crochet tulips knows no bounds. Whether as single flowers in a lovely vase arrangement or as a colorful bouquet, they’re sure to catch everyone’s eye. Use them as window decorations by hanging them with a pretty ribbon or attaching them directly to the curtains.
Unique Accents
What makes crochet tulips so special is their uniqueness. Each flower is a one-of-a-kind creation. They make the perfect gift for friends and family or a personal treat just for you.
Conclusion
With handmade crochet tulips, you can instantly bring a touch of spring to your home. Their loving craftsmanship, creative versatility, and unique personality make them an irresistible decor idea for any home. So grab your crochet hook and let your creative side bloom!
If you like my blog, I would be very happy if you follow it. Your feedback and comments are always welcome!


And here’s how to crochet them:

Crochet Instructions:

Flower: any color
Start with a double magic ring and work in spiral rounds.

Tip: Always mark the first stitch. I always use a thread.

Round 1:
Crochet 12 single crochet into the magic ring
(12)

Round 2:
(1 single crochet increase, 1 single crochet) x6
(18)

From Round 3 onwards, crochet twisted single crochets.
Round 3:
(1 single crochet increase, 2 single crochet) x6
(24)

Round 4:
24 single crochet
(24)

Round 5:
(1 single crochet increase, 7 single crochet) x3
(27)

Round 6:
27 single crochet
(27)

Round 7:
(1 single crochet increase, 8 single crochet) x3
(30)

Round 8:
30 single crochet
(30)

Round 9:
(1 single crochet increase, 9 single crochet) x3
(33)

Round 10:
33 single crochet
(33)

Round 11:
(1 single crochet increase, 10 single crochet) x3
(36)

Round 12:
36 single crochet
(36)

Round 13:
36 single crochet
(36)

Round 14:
(1 single crochet increase, 11 single crochet) x3
(39)

Round 15:
39 single crochet
(39)

Round 16:
(1 single crochet increase, 12 single crochet) x3
(42)

Round 17:
42 single crochet

(1 single crochet decrease, 7 single crochet) x3
(42)

Round 18:
This round consists of 6 slip stitches. Crochet 1 slip stitch in every 7th stitch. Stuff with fiberfill after the third slip stitch. Finish by weaving in the threads and shaping the flower.

Stem: green color
Wrap 3 wooden skewers with green yarn. Start with a secure loop at the pointed end. Secure the yarn between the sticks at the other end.
Insert the tip of this stem about 1-2 cm into the magic ring of the flower and sew it tightly with thin yarn.


Leaf: green color
Work in spiral rounds again.
Remember to mark the beginning of each round.

Round 1:
6 single crochet into a magic ring
(6)

Round 2:
(1 single crochet increase, 2 single crochet) x2
(8)

Round 3:
8 single crochet
(8)

Round 4:
(1 single crochet increase, 3 single crochet) x2
(10)

Rounds 5 & 6:
10 single crochet
(10)

Round 7:
(1 single crochet increase, 4 single crochet) x2
(12)

Rounds 8 & 9:
12 single crochet
(12)

Round 10:
(1 single crochet increase, 3 single crochet) x3
(15)

Rounds 11 & 12:
15 single crochet
(15)

Round 13:
(1 single crochet increase, 4 single crochet) x3
(18)

Round 14:
18 single crochet
(18)

Round 15:
(1 single crochet increase, 5 single crochet) x3
(21)

Rounds 16 & 17:
21 single crochet
(21)

Round 18:
(1 single crochet increase, 6 single crochet) x3
(24)

Rounds 19 & 20:
24 single crochet
(24)

Round 21:
(1 single crochet increase, 7 single crochet) x3
(27)

Rounds 22-31:
27 single crochet
(27)

Round 32:
(1 single crochet decrease, 7 single crochet) x3
(24)

Rounds 33 & 34:
24 single crochet
(24)

Round 35:
(1 single crochet decrease, 6 single crochet) x3
(21)

Rounds 36 & 37:
21 single crochet
(21)

Round 38:
(1 single crochet decrease, 5 single crochet) x3
(18)

Rounds 39-49:
18 single crochet (11 rounds)
(18)

Round 50:
Fold the leaf together (with very soft yarn, you can cut out a leaf from plastic and insert it into the crochet leaf) and crochet the opposite stitches together.
(8 stitches) and the last stitch is a slip stitch. Cut the yarn, leaving about 10 cm.

Sew the leaf securely around the stem with the yarn.

Dienstag, 6. August 2024

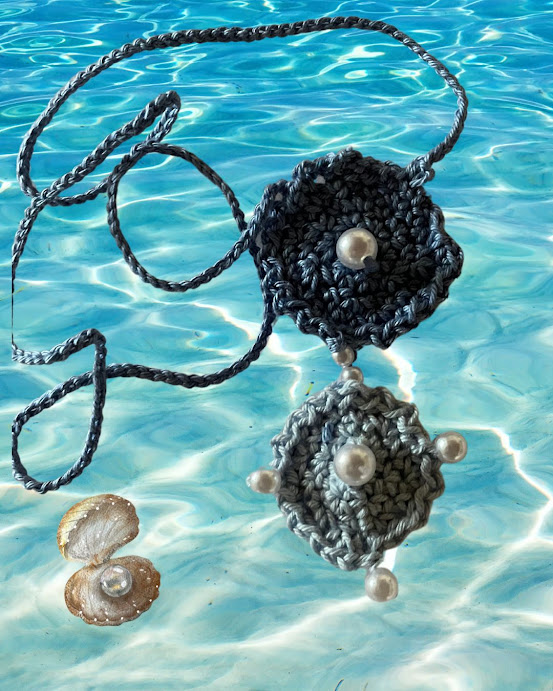
Simple crocheted necklace with beads. (eng )

Simple crocheted necklace with beads.

Simple crocheted necklace with beads.

Discover the Creative World of Crocheted Jewelry! why this unique craft is a must-have for fashion enthusiasts and how you can create personal touches with crocheted jewelry.


Why Crocheted Jewelry is So Special

What makes crocheted jewelry so unique? It’s the variety of design possibilities available to you. The choice of yarn, colors, and patterns gives you great freedom to add your own touches. Different crochet techniques like single crochet, chain stitches, or double crochet allow you to customize the structure and shape of your jewelry pieces.

Another major advantage of crocheted jewelry is its lightness. Unlike traditional jewelry made from metal or glass, which can often be heavy and bulky, crocheted jewelry is pleasantly lightweight. At the same time, it remains durable and long-lasting, making it an excellent choice for everyday wear. High-quality materials ensure that you will enjoy your piece for a long time and love wearing it repeatedly.

Inspiration: A Crocheted Necklace Reminiscent of the Sea

Imagine a necklace that instantly evokes memories of the sea: deep blue, shimmering beads, and elegant simplicity. This crocheted necklace combines two simple circles with delicate beads that perfectly complement the design and add a maritime touch.

Features of This Crocheted Necklace:

  • Material and Color: The yarn used is in a deep and light blue, reflecting the vastness and depth of the ocean. Small, shiny beads add subtle accents and capture the light, like the sun on ocean waves.

Crocheted jewelry is more than just an accessory—it is an expression of creativity and craftsmanship. Through the choice of yarn, color, and design, you can create pieces that are as unique as you are. Whether you're looking for a new hobby or want to add a personal touch to your style, crocheted jewelry offers you the perfect opportunity to combine both.

Don’t miss out on the latest trends and inspiration in crocheted jewelry! Follow my blog for more creative ideas and tutorials. Get inspired and create your own masterpieces!


Crochet Pattern:

Large Circle:

  • Round 1: Crochet 6 single crochets into a magic ring. Close with a slip stitch.
    (6 stitches)

  • Round 2: Chain 1 (does not count as a stitch). Double each stitch. Slip stitch into the first chain.
    (12 stitches)

  • Round 3: Chain 1 (does not count as a stitch). 1 single crochet, increase 1 stitch repeat to the end. Slip stitch into the first chain.
    (18 stitches)

  • Round 4: Chain 1 (does not count as a stitch). 2 single crochets, increase 1 stitch repeat to the end. Slip stitch into the first chain.
    (24 stitches)

  • Round 5: Chain 1 (does not count as a stitch). 1 slip stitch, chain 1 in each stitch. Slip stitch into the first chain.


Small Circle:

  • Round 1: Crochet 6 single crochets into a magic ring. Close with a slip stitch.
    (6 stitches)

  • Round 2: Chain 1 (does not count as a stitch). Double each stitch. Slip stitch into the first chain.
    (12 stitches)

  • Round 3: Chain 1 (does not count as a stitch). 1 single crochet, increase 1 stitch repeat to the end. Slip stitch into the first chain.
    (18 stitches)

  • Round 4: Chain 1 (does not count as a stitch). 1 slip stitch, chain 1 in each stitch. Slip stitch into the first chain.

Sew the circles together and add beads as desired.

Now, using a smaller crochet hook, crochet a very tight chain stitch necklace. The necklace should be long enough that you can wear it without needing a clasp.

Mittwoch, 17. Juli 2024

An Iris Blossom ( eng )

 An Iris Blossom

The Beauty of the Crocheted Iris Blossom: A Masterpiece of Yarn

Welcome to my blog! Today, I’ll show you how to create the fascinating crocheted iris blossom – a true masterpiece of yarn that will elevate your crochet projects to the next level. Learn why this flower is a must-have project for every crochet enthusiast.

The Crocheted Iris Blossom: A Detailed Crochet Project

The crocheted iris blossom is more than just a simple project. It is a detailed artwork that captures the elegance and vibrant colors of nature in yarn. The versatility of this crochet flower makes it a highlight in any creative project.

Why Crochet an Iris Blossom?

Decorative Variety: A crocheted iris blossom offers countless uses. Whether as a central decoration in a bouquet or a stylish table decor – this flower enhances any arrangement. Vibrant Colors: The iris stands out with its vivid colors – from deep blue to bright yellow to delicate white or violet. With crochet, you can perfectly replicate this color palette and make your projects colorful. Complexity and Challenge: Crocheting an iris blossom is a challenging project that teaches new techniques to both beginners and experienced crocheters. It’s a wonderful opportunity to expand your skills and experience a sense of accomplishment.

Ideas for Using Your Crocheted Iris Blossom

Home Decor: Add an elegant touch to your home decor by displaying the crocheted iris blossom in vases or decorative bowls. It also looks great as a wreath or garland, all year round. Gifts: Handmade gifts always carry a special meaning. A crocheted iris blossom is a loving and personal gift for friends and family. Show them how much they mean to you.

A Project of Passion

Crocheting an iris blossom requires patience, precision, and attention to detail. The effort is worth it because the end result is an incomparable piece of art that reflects the beauty of nature in your handiwork. Something wonderful is created from simple yarn.

Whether you are just starting with crocheting or are already an experienced crochet artist – the crocheted iris blossom offers a wonderful way to expand your skills and express your creativity. Dive into the world of crocheting and be inspired by the fascinating beauty of the iris blossom.

Follow my blog for more crochet tutorials and tips! Feel free to leave your comments and share your experiences with crocheted projects. Your feedback is important to me and helps improve the blog. Thank you for your support and happy crocheting!

Crochet Instructions

For these flowers, besides yarn and a corresponding crochet hook, you will also need:

  • Silver or gold floral wire, with a diameter of 0.35 mm
  • Green stem wire, 0.8 mm thick
  • Green floral tape about 12 mm wide
  • Wire cutters
  • Hot glue

Continue with the Instructions

Petals 6x

Crochet with single crochet (sc) in rows, ending each row with a turning chain.

With blue yarn:

  • Chain 2 and make a turning chain

Row 1:

  • In each chain, make 2 sc (4)

Row 2:

  • Increase the first and last stitch (6)

Row 3:

  • Crochet 6 sc, place a marker on both sides (6)

Rows 4-6:

  • Crochet 6 sc each row (6)

Row 7:

  • Crochet the first and last 2 stitches together (4)

Rows 8-15:

  • Crochet 4 sc each row (4)

Row 16:

  • Crochet 2 sc together (2)

Row 17:

  • Crochet 2 sc (2)

Now, place a 35 cm piece of silver or gold floral wire along the outer edge of the petal. Crochet around the petal in the same or a different shade of blue, incorporating the wire:

  • Crochet around the petal with sc up to the first marker. From there, crochet 3 half double crochets (hdc) in each stitch until the next marker, then continue with sc.
  • After finishing, cut the thread with about 10 cm extra. Twist the wire ends together.
  • Sew in the yarn end.

Yellow Strip 3x

With yellow yarn:

  • Chain 14 and 2 chains as a substitute for 2 hdc
  • In the 3rd chain from the hook, crochet (1 hdc + 1 chain + 2 hdc)
  • Then crochet 1 sc in each subsequent chain.
  • Finish, cut the yarn, and sew in the end.

Calyx

Crochet the calyx with sc in rounds, closing each round with a slip stitch.

With green yarn:

  • Chain 6 and close the round with a slip stitch

Round 1:

  • Crochet 12 sc in the ring (12)

Rounds 2-3:

  • Crochet 12 sc in each round (12)

Finish, cut the yarn, and sew in the end.

Leaf

Crochet with sc in rows, ending each row with a turning chain.

Chain 1 and make a turning chain.

Row 1:

  • Crochet 2 sc in the starting chain.

Row 2:

  • Crochet 2 sc (2)

Row 3:

  • Double each sc (4)

Rows 4-45:

  • Crochet 4 sc each row (4)

Place a 55 cm piece of green floral wire along the outer edge of the leaf and crochet around the leaf with sc, incorporating the wire. At the tip of the leaf, crochet 3 sc in one stitch.

  • Finish, cut the yarn, and sew in the end.
  • Twist the wire ends together.

Finishing

  • Sew one yellow strip onto each of the 3 petals (see photo).
  • Trim all wire stems to about 5 cm with wire cutters.
  • Arrange the 3 petals without strips into a triangle and twist the wire ends together.
  • Then arrange the 3 petals with strips around the first 3 petals and twist the wire ends together.
  • Place the stem wire at the bottom of the flower and twist it with the wire ends of the petals. Secure with a bit of hot glue. Slide the calyx over the stem wire up to the petals.
    • ATTENTION: Add a drop of hot glue inside the calyx beforehand.
  • Twist all wire ends tightly together and wrap them densely with floral tape. Secure with a bit of hot glue.
  • Place the leaf against the stem and twist the wire slightly with the stem. Wrap tightly with floral tape and secure with a drop of hot glue.
  • Shape the petals as desired

Montag, 3. Juni 2024

Granny Square: A Blossom ( eng )

Granny Square: A Blossom 


Discover the versatility of the Granny Square for your next crochet project.

Are you looking for a Granny Square for your next project? Then you’re in the right place! Discover this timeless beauty and let yourself be inspired by this free pattern. Whether for cardigans, sweaters, blan
kets, bags, or accessories – the versatility of the Granny Square will amaze you. Dive into the world of creativity and craft your own unique pieces with joy and fun. Indulge in your love for crochet and discover new trends and ideas.

What is a Granny Square?

A Granny Square is a square crochet motif traditionally made up of several rounds. It can be created in various colors and patterns and is incredibly versatile. The classic design makes it simple yet exciting to create different projects.

Uses for Your Granny Square:

  • Cardigans: Connect several Granny Squares to create stylish and comfortable cardigans.
  • Sweaters: Combine different colors and patterns to design unique sweaters.
  • Blankets: Use colorful Granny Squares to crochet cozy and beautiful blankets.
  • Bags: A Granny Square can be the perfect start for a handmade bag.
  • Accessories: Decorate hats, scarves, or even home decor items with Granny Squares.

Why Granny Squares?

Granny Squares are not only a creative outlet but also a great way to use up leftover yarn and create unique, handmade gifts. They are perfect for beginners looking to improve their crochet skills as well as for experienced crocheters seeking new challenges.

Conclusion

Whether you are a beginner or an experienced crocheter, Granny Squares offer endless possibilities for creative projects. Let this pattern inspire you and create your own masterpieces. Share your finished projects in the comments and let us know which colors and designs you used. Happy crocheting and see you next time!


Download HERE

You will need 3 colors. Choose colors as you like.

Round 1 (Color A):

Chain 3 (counts as 1 dc) and crochet 11 dc into a magic ring. Slip stitch into the 3rd chain.     (12 stitches)

Round 2:

Crochet 2 sc into each of the 12 dc. Fasten off and invisibly close the round in the 2nd stitch.      (24 stitches)

Round 3 (Color B):

Attach yarn in any stitch with a standing stitch. 5 dc in the next stitch, skip 1 stitch, slip stitch, skip 1 stitch repeat 5 times, slip stitch into the 1st dc.      (36 stitches)

Round 4:

Chain 2 (counts as 1 hdc), 1 hdc, 2 hdc in the next stitch, 2 hdc, slip stitch into the 2nd round over the slip stitches of the 3rd round. 2 hdc, 2 hdc in the next stitch, 2 hdc, slip stitch into the 2nd round over the slip stitches of the 3rd round repeat 4 times. Fasten off and invisibly close the round in the 1st actual hdc.      (42 stitches)

Round 5 (Color C):

Attach yarn in any 2 hdc of a petal with a standing stitch. 4 sc, 1 hdc, 2 hdc in the next slip stitch, 1 hdc repeat 5 times, slip stitch into the 1st sc.         (48 stitches)

Round 6:

4 sc, 3 hdc, 2 dc + 2 chains + 2 dc in the next stitch, 3 hdc 5 sc, 3 hdc, 2 dc + 2 chains + 2 dc in the next stitch, 3 hdc repeat 2 times, 1 sc, slip stitch into the 1st sc.         (60 stitches + 8 chains)

Round 7:

6 sc, 2 hdc, 1 hdc + 2 chains + 1 hdc in the next chain space 2 hdc, 11 sc, 2 hdc, 1 hdc + 2 chains + 1 hdc in the next chain space repeat 2 times, 2 hdc, 5 sc, slip stitch into the 1st sc.      (68 stitches + 8 chains)

Round 8:

1 sc + 2 chains + 1 sc in the next chain space, skip 1 stitch (hidden), 16 sc, 1 sc + 2 chains + 1 sc in the next chain space, skip 1 stitch (hidden) repeat 2 times, 8 sc. Fasten off and invisibly close the round in the 2nd stitch.

If you like my blog, I would be very happy if you follow my blog. Your feedback and comments are always welcome! 


Freitag, 31. Mai 2024

Dahlia Blossom ( eng )

Dahlia Blossom


Simple Crocheted Dahlia Flower: A Versatile Project for Irish Crochet

Welcome to my blog! Today, I want to introduce you to a special project: the simple crocheted dahlia flower. This pretty flower is not only a great beginner project for novices but also incredibly versatile. It is perfect for decorating pillows, cardigans, dresses, and much more. Additionally, it can be used as a component of Irish crochet, a technique known for its delicate and detailed patterns.

Applications:

The simple crocheted dahlia flower can be used in a variety of ways:

Pillow Decoration:

Sew one or more flowers onto a plain pillow to give it a touch of elegance and individuality. The delicate, handcrafted flowers add a personal touch and make each pillow a unique work of art.

Embellishing Cardigans:

Add a highlight to a simple cardigan by attaching a flower to the collar or pocket. These small details can transform a simple piece of clothing into something special, suitable for everyday wear as well as special occasions.

Enhancing Dresses:

Attach the flowers to the hem of a dress or the straps to create a unique and romantic look. These flowers add a hint of vintage chic to your outfit, perfect for weddings, garden parties, or other festive events.

Irish Crochet:

Integrate the flower into larger Irish crochet projects. Combine it with leaves and other flowers to create beautiful, intricate pieces. The art of Irish crochet is known for its intricate and complex patterns, and the dahlia flower fits perfectly into this tradition.

Conclusion:

The crocheted dahlia flower is a simple and versatile project that will bring joy to any craft enthusiast. With just a few materials and a bit of time, you can create charming decorations that enhance your clothing and home. The versatility of this small project means that you have countless opportunities to express your creativity and add personal, handmade touches.

Happy crocheting!

Follow my blog for more crochet patterns and tips! Feel free to leave your comments and share your experiences with Irish crochet. Your feedback is important to me and helps improve the blog. Thank you for your support and happy crocheting


Dahlia Blossom

Two colors are used for this blossom.

Begin with a ring made of 8 chains (ch) and 1 slip stitch (sl st) using Color A.

Round 1

Using Color A, crochet 3 chains (counts as the 1st double crochet (dc)) and 19 double crochets. Close this round with a slip stitch into the 1st double crochet.

Round 2

Attach Color B to any double crochet and crochet 9 chains for the petal. Skip 1 chain and crochet 1 single crochet (sc) and 7 double crochets back, then crochet 1 single crochet into the next double crochet of the previous round. Repeat this pattern 19 times.

Replace the last single crochet with a slip stitch. Cut and weave in the ends.


Download HERE


Mittwoch, 29. Mai 2024

Small Almond Blossom ( eng )

Small Almond Blossom


Crocheted Almond Blossom: A Touch of Spring for Your Home

Welcome to my blog! Today, I want to share a delightful crochet pattern that brings the feeling of spring directly into your home – a crocheted almond blossom. This delicate flower is not only beautiful to look at, but also versatile as a decoration. Whether for the table, as a gift, or for embellishing clothing and accessories. Made with fine yarn, this almond blossom can also be used as a piece of jewelry, such as a brooch. The crocheted almond blossom adds a special touch to any project.

Usage Ideas

Table Decoration: Place the crocheted almond blossom on your dining table to create a spring-like atmosphere.
Gift Decoration: Attach the blossom to a gift to add a personal and handmade touch.
Accessories: Use the blossom as a brooch or hair accessory by attaching a safety pin or hairband.
Cards: Decorate greeting cards or invitations by sticking the blossom onto them for a special 3D effect.

I hope this pattern inspires you to create your own crocheted almond blossom. It is not only a beautiful decoration piece but also a lovely handmade gift. Enjoy crocheting and decorating! If you have any questions or would like to share your finished blossoms, feel free to leave a comment. I always appreciate your creative ideas and suggestions!


Download HERE

You will need 3 colors.

Start with Color A: Make a ring with 5 ch and 1 sl st.

Round 1: Crochet 10 sc into the ring. Close the round with a sl st into the first sc.

Round 2: Join with Color B, chain 2 (counts as the first dc), crochet 1 dc into the same sc and close with the chain stitches, 1 ch + 2 dc together into the next sc + 5 ch + 2 dc together into the next sc repeat 5 times. Close the round with a sl st into the first dc.

Round 3: Join with Color A in a ch space, chain 3 (counts as a dc) + 10 dc into this space, in the next space crochet 11 dc repeat 4 times. Close the round with a sl st into the first dc.

Round 4: With Color C, crochet 1 sc into each of the 11 dc, then 2 long sc around the ch of round 2, crocheting round 3 together. Close the round with a sl st into the first sc.

If you like my blog, I would be very happy if you follow my blog. Your feedback and comments are always welcome! 


83 Amigurumi: Zwei gehäkelte Kakteen

Amigurumi: Gehäkelte Kakteen Gehäkelte Kakteen: Pflegeleichte Deko für dein Zuhause Zimmerpflanzen bringen Frische und Gemütlichkeit in die ...