Blog-Archiv

Samstag, 18. Mai 2024

Amigurumi: Corn Cob (eng )

Amigurumi: Corn Cob .


A Charming DIY Project for Fall and Kitchen

Welcome to a delightful DIY project that will not only enhance your fall decor but also make a great addition to the kids' kitchen and play store – a lovingly crocheted Amigurumi corn cob! This vegetable is versatile and brings color and joy to any room.

What is Amigurumi?

Amigurumi is a Japanese art form that involves creating small, knitted or crocheted figures. These cute creations are often animals, fruits, or fantasy characters and are known for their loving details. The best part: with Amigurumi, you can unleash your creativity and create unique decorative objects.

Perfect Fall Decor

The Amigurumi corn cob is the ideal addition to your fall decor. Its bright yellow kernels and green leaves bring a touch of nature into your home and perfectly complement other autumn decorations like pumpkins and colorful leaves. Place it on your dining table as part of a fall centerpiece or arrange several corn cobs in a basket for a rustic atmosphere.

Charming Kitchen Decor

Why not also adorn your kitchen with an Amigurumi corn cob? It’s a charming and unconventional decoration that is sure to spark conversations. Place it on the windowsill, in a shelf, or on the countertop to add a touch of handmade warmth to your kitchen.

Fun Table Decor for Special Occasions

For special occasions like Thanksgiving or fall parties, the Amigurumi corn cob makes a wonderful table decoration. It can serve as a place holder or simply as a little eye-catcher on each place setting. Guests will be delighted by this creative and handmade decoration idea.

Perfect for the Kids' Kitchen and Play Store

Kids love playing with realistic-looking foods in their play kitchen or play store. A crocheted corn cob is perfect for role-playing and helps little ones learn more about different types of vegetables. It’s soft, safe, and durable – ideal for hours of play.

Versatility with Different Yarn Types

The Amigurumi corn cob can be crocheted with various types of yarn, giving it different textures and sizes. Plush yarn makes it particularly cuddly and child-friendly, while cotton provides a firmer and more structured option. Experiment with different yarns to create unique and individual corn cobs.

Conclusion

An Amigurumi corn cob is a versatile and charming DIY project that is well-received as both fall and kitchen decor as well as a toy for children. With little effort, you can create a delightful decorative piece that brings joy and creativity to your home. Whether on the dining table, in the kitchen, or in the children's room – this crocheted corn cob is a real eye-catcher and provides a warm, handmade atmosphere.

Have fun decorating and playing with your own Amigurumi corn cob!


Download HERE

Autumn Decoration

It is crocheted in rounds.

Büm = Puff stitch


The Corn Cob


Rd. 1 Color Yellow

Crochet 10 sc into a magic ring. Close with a sl st.


Rd. 2

2 ch, crochet a 4 puff stitch in each sc close with a sl st in the first sc.

(10 + 2 ch)


Rd. 3

2 ch, always crochet two 4 puff stitches in 1 st (between 2 puff stitches of Rd. 2) Close with a sl st in the first puff stitch.

(20 + 2 ch)


Rd. 4 - 15

2 ch, 20 4 puff stitches Close with a sl st in the first puff stitch.

(20 + 2 ch)


Rd. 16 - 19

Always start the round with 2 ch. In each round decrease 1 puff stitch, shifting the decrease slightly in each round. Close with a sl st in the first puff stitch.

Stuff with fiberfill.


Rd. 20

2 ch, 16 4 puff stitches. Close with a sl st in the first puff stitch.

(16 + 2 ch)


Rd. 21

2 ch, decrease 5 puff stitches evenly. Close with a sl st in the first puff stitch.

(11 + 2 ch)


Rd. 22

2 ch, 11 4 puff stitches. Close with a sl st in the first puff stitch.

(11 + 2 ch)


Rd. 23

2 ch, decrease 3 puff stitches evenly. Close with a sl st in the first puff stitch.

(8 + 2 ch)


Rd. 24

2 ch, 8 4 puff stitches. Close with a sl st in the first puff stitch.

Stuff again with fiberfill.

Rd. 25

2 ch, decrease 4 puff stitches. Close with a sl st in the first puff stitch.

(4 + 2 ch)


Rd. 26

2 ch, 4 dc. Close with a sl st in the first dc.

(4 + 2 ch)


Cut the yarn. Stuff again with some fiberfill. Pull the stitches together with the yarn and sew it closed.


The Leaves 3 x


Chain 41.

Start in the 2nd ch from the hook. Crochet 1 sc in each ch except the last one. Crochet 2 sc in the last st.

Crochet back along the other side of the chain, stop 6 sts before the end, then crochet 1 sl st and 1 turning ch.

Turn the leaf and crochet 1 sl st in the 2nd sc, then continue with sc, around the bottom and back up, stopping 8 sts before the end.

Repeat the same procedure on the other side and back again.

See the diagram.

The diagram shows the working direction for the leaf. The dot in the middle is the start and the bottom outer point is the end.

Sew the leaves at the bottom of the corn cob.

35 Amigurumi: Maiskolben

Amigurumi: Maiskolben 

Mit Häkelanleitung


Ein charmantes DIY-Projekt für Herbst und Küche

Herzlich willkommen zu einem bezaubernden DIY-Projekt, das nicht nur Ihre Herbstdeko verschönern, sondern auch in der Kinderküche und im Kaufmannsladen eine großartige Figur machen wird – ein liebevoll gehäkelter Amigurumi Maiskolben! Diese Gemüse ist vielseitig einsetzbar und bringt Farbe und Freude in jeden Raum.

Was ist Amigurumi?

Amigurumi ist eine japanische Kunstform, bei der kleine, gestrickte oder gehäkelte Figuren entstehen. Diese niedlichen Kreationen sind oft Tiere, Früchte oder Fantasiefiguren und sind bekannt für ihre liebevollen Details. Das Beste daran: Mit Amigurumi können Sie Ihrer Kreativität freien Lauf lassen und einzigartige Dekorationsobjekte schaffen.

Perfekte Herbstdeko

Der Amigurumi Maiskolben ist die ideale Ergänzung für deine Herbstdeko. Seine leuchtend gelben Körner und die grünen Blätter bringen einen Hauch von Natur in dein Zuhause und passen perfekt zu anderen Herbstdekorationen wie Kürbissen und buntem Laub. Platziere ihn auf deinem Esstisch als Teil eines herbstlichen Mittelstücks oder arrangiere mehrere Maiskolben in einem Korb für eine rustikale Atmosphäre.

Charmante Küchendeko

Warum nicht auch Ihre Küche mit einem Amigurumi Maiskolben verschönern? Er ist eine hübsche und unkonventionelle Dekoration, die garantiert für Gesprächsstoff sorgt. Stelle ihn auf das Fensterbrett, in ein Regal oder auf die Arbeitsplatte, um Ihrer Küche einen Hauch von handgemachter Wärme zu verleihen.

Spaßige Tischdeko für besondere Anlässe

Für besondere Anlässe wie Erntedankfest oder Herbstfeiern ist der Amigurumi Maiskolben eine wunderbare Tischdekoration. Er kann als Platzhalter oder einfach als kleiner Hingucker auf jedem Gedeck dienen. Die Gäste werden begeistert sein von dieser kreativen und handgemachten Dekorationsidee.

Perfekt für die Kinderküche und den Kaufmannsladen

Kinder lieben es, in ihrer Spielküche oder ihrem Kaufmannsladen mit realistisch aussehenden Lebensmitteln zu spielen. Ein gehäkelter Maiskolben ist perfekt für Rollenspiele und hilft den Kleinen, mehr über verschiedene Gemüsearten zu lernen. Er ist weich, sicher und langlebig – ideal für stundenlanges Spielvergnügen.

Vielseitigkeit durch verschiedene Wollarten

Der Amigurumi Maiskolben kann aus verschiedenen Wollarten gehäkelt werden, was ihm unterschiedliche Texturen und Größen verleiht. Flauschwolle macht ihn besonders kuschelig und kindgerecht, während Baumwolle eine festere und strukturellere Option bietet. Experimentiere mit verschiedenen Wollarten, um einzigartige und individuelle Maiskolben zu schaffen.

Fazit

Ein Amigurumi Maiskolben ist ein vielseitiges und charmantes DIY-Projekt, das sowohl als Herbst- und Küchendeko als auch als Spielzeug für Kinder großen Anklang findet. Ohne viel Aufwand kannst du ein bezauberndes Dekorationsstück erschaffen, das Freude und Kreativität in dein Zuhause bringt. Ob auf dem Esstisch, in der Küche oder im Kinderzimmer – dieser gehäkelte Maiskolben ist ein echter Hingucker und sorgt für eine warme, handgemachte Atmosphäre.

Viel Spaß beim Dekorieren und Spielen mit Ihrem eigenen Amigurumi Maiskolben!


💕Folgte meinem Blog für weitere Häkelanleitungen und Tipps! Hinterlasst gerne eure Kommentare und teilt eure Erfahrungen mit dieser Häkelarbeit. Euer Feedback ist mir wichtig und hilft, den Blog weiter zu verbessern. Vielen Dank für eure Unterstützung und viel Spaß beim Häkeln!


Häkelanleitungen nach diesem Beitrag.

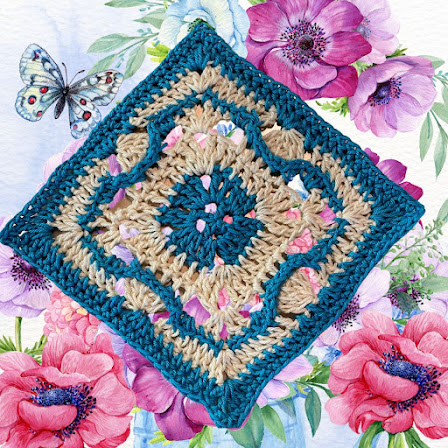
Granny Square: Two-Toned, Airy Square ( eng )

Granny Square: Two-Toned, Airy Square 


Granny Square: More Than Just a Simple Pattern

Discover the boundless versatility of the Granny Square! From practical pot holders to trendy clothing such as boleros, tops, cardigans, coats, dresses, skirts, and even trousers in the fashionable retro style of the 60s, you can crochet it all! And even jewelry - this timeless crochet pattern knows no bounds.

You achieve fascinating effects by using different yarns. Whether wool, cotton, silk, lace or textile yarn, rope yarn or synthetic fiber - every conceivable material gives your projects a unique charm and character. Let your creativity run wild.

Immerse yourself in the world of crocheting and discover how the Granny Square can inspire your creativity. Whether you're just starting out or an experienced crafter, this versatile pattern will constantly surprise and inspire you.


If you enjoy my blog, I would be delighted if you would follow it. Your feedback and comments are always warmly welcomed! 💕"


.      


Download Deutsch: HIER


Download: HERE

You'll need 2 colors. To achieve this effect, try using white and a bold color.

ihM = in back loop only


Rd. 1 Bold Color

Crochet 5 starting ch (counts as 1 dc + 2 ch). Crochet into a magic ring.

1 dc, 2 ch repeat 2 times.

Finish off, closing the round invisibly in the 4th ch.

(4 + 8 ch)


Rd. 2

Join yarn in any 2-ch space, start with a standing dc.

2 dc + 2 ch + 2 dc in the 2-ch space, 1 dc repeat 3 times.

Finish off, closing the round invisibly in the 2nd dc.

(20 + 8 ch)


Rd. 3 White

Join yarn in any 2-ch space, start with a standing dc.

2 tr + 2 ch + 2 tr in the 2-ch space, 5 dc repeat 3 times.

Sl st into the 1st tr.

(36 + 8 ch)

Rd. 4

Sl st into the next tr, 1 sl st in the corner 2-ch space, 3 ch (counts as 1 dc) + 1 dc + 2 ch + 2 dc in the corner 2-ch space, 3 ch, skip 2 ch, 5 dc, 3 ch, skip 2 sts, 2 dc + 2 ch + 2 dc in the corner ch space, 3 ch, skip 2 sts, 5 dc, 3 ch, skip 2 sts repeat 2 times.

Finish off, closing the round invisibly in the 1st dc.

(36 + 20 ch)


Rd. 5 Bold Color

Join yarn in any 2-ch space, start with a standing sc.

1 sc + 2 ch + 1 sc in the corner 2-ch space, 1 sc in each of the next 2 dc, 3 hdc in the next 3-ch space, 1 ch, sl st in the next st, 2 sl st tog around the next 2 dc, 1 sc around the next dc, 2 sl st tog around the next 2 dc, 1 ch, 3 hdc in the next 3-ch space, 2 sc repeat 3 times.

Finish off, closing the round invisibly in the 1st ch after the 1st sc.

(60 + 16 ch)


Rd. 6 White

Join yarn in any corner 2-ch space, start with a standing dc.

2 dc + 2 ch + 2 dc in the corner 2-ch space, 6 dc ihM, 2 ch, join the next 5 dc of the 4th round, 2 ch, 6 dc ihM repeat 3 times.

Finish off, closing the round invisibly in the 2nd dc.

(68 + 24 ch)


Rd. 7 Bold Color

Join yarn in any corner 2-ch space, start with a standing dc.

2 dc + 2 ch + 2 dc in the corner 2-ch space, 8 hdc, 2 hdc in the next ch space, 1 dc, 2 hdc in the next ch space, 8 hdc repeat 3 times.

Sl st into the 1st dc.

(100 + 8 ch)


Rd. 8

Sl st into the next dc, sl st into the corner ch space, 3 ch (counts as 1 sc + 2 ch) + 1 sc in the corner 2-ch space, skip 1 st, 24 sc, 1 sc + 2 ch + 1 sc in the corner 2-ch space, skip 1 st, 24 sc repeat 2 times.

Finish off, closing the round invisibly in the 2nd ch.

(104 + 8 ch)


34. Granny Square: Zweifarbiges, luftiges Quadrat

Granny Square: Zweifarbiges, luftiges Quadrat 

Mit Häkelanleitung


Kostenlose Häkelanleitung für ein zweifarbiges, luftiges Granny Square in Blau und Sand – ideal für sommerliche Häkelprojekte wie Kleidung, Accessoires und Deko


Luftiges zweifarbiges Granny Square – Perfekt für sommerliche Häkelprojekte

Der Sommer ist die ideale Zeit für leichte und luftige Häkelprojekte! Wer auch an warmen Tagen kreativ bleiben möchte, wird das zweifarbige Granny Square lieben. Es verbindet sommerliche Farben mit einem luftigen Muster und eignet sich perfekt für Kleidung, Accessoires oder dekorative Elemente.

Sommerliche Farbenspiele: Blau und Sand als perfekte Kombination

Farbwahl spielt bei jedem Häkelprojekt eine wichtige Rolle. Besonders im Sommer sind frische, leichte Farben gefragt. Die Kombination aus Blau und Sand versprüht sofort ein maritimes Flair und erinnert an Strand, Meer und sonnige Tage. Diese Farbkombination ist zeitlos und passt wunderbar zu sommerlichen Outfits. Doch wer experimentierfreudig ist, kann mit anderen Farben ganz unterschiedliche Effekte erzielen. Knallige Töne wie Pink und Türkis bringen ein tropisches Feeling, Pastelltöne verleihen eine romantische Note, und Schwarz-Weiß wirkt besonders elegant.

Vielseitige Einsatzmöglichkeiten: Von Kleidung bis Deko

Das zweifarbige Granny Square ist nicht nur wunderschön, sondern auch extrem vielseitig einsetzbar. Wer es modisch mag, kann daraus luftige Kleidungsstücke wie Cardigans, Ponchos oder Strandkleider zaubern. Gerade für den Sommer ist es eine tolle Alternative zu schweren Stoffen. Auch als Schal oder Stola eignet es sich hervorragend für kühlere Abende.

Doch nicht nur in der Mode macht das Granny Square eine gute Figur. Als dekoratives Element bringt es sommerliches Flair ins Zuhause. Ob als Tischläufer, Kissenhülle oder Wanddeko – die kreativen Möglichkeiten sind nahezu endlos. Besonders schön: Einfache Baumwolltaschen lassen sich mit diesen Granny Squares aufwerten und verwandeln sich in stylische Accessoires für den Sommer.

DIY-Trend: Nachhaltiges Häkeln mit Stil

Handarbeit erlebt eine echte Renaissance, und Granny Squares sind ein wichtiger Teil dieses Trends. Selbstgemachte Häkelprojekte stehen nicht nur für Kreativität, sondern auch für Nachhaltigkeit. Wer eigene Kleidung und Accessoires häkelt, setzt auf Individualität und vermeidet Massenproduktion. Zudem lassen sich Garnreste wunderbar verwerten, was besonders nachhaltig ist.

Entspannung durch Häkeln: Kreativität und Achtsamkeit kombinieren

Häkeln ist mehr als nur ein Hobby – es ist eine kreative Form der Entspannung. Das rhythmische Arbeiten mit der Häkelnadel wirkt meditativ und kann helfen, den Alltagsstress hinter sich zu lassen. Gleichzeitig entstehen wunderschöne, individuelle Stücke, die mit viel Liebe gefertigt werden.

Werde kreativ und probiere es aus!

Das zweifarbige Granny Square ist ein fantastisches Sommerprojekt für alle, die Häkeln lieben oder es lernen möchten. Es ist leicht anzupassen, schnell gemacht und unglaublich vielseitig. Mit der richtigen Farbkombination entstehen ganz unterschiedliche Looks, die zu jeder Gelegenheit passen. Ob für Mode, Deko oder Accessoires – dieses Granny Square ist ein echtes Must-have für die warme Jahreszeit!

Wenn dir dieser Artikel gefallen hat, folge mir für mehr inspirierende DIY-Projekte und kreative Dekoideen. Ich freue mich, wenn du deine Gedanken und Tipps in den Kommentaren teilst.


Häkelanleitungen nach diesem Beitrag.

Donnerstag, 16. Mai 2024

33. Granny Square: Große 3D Blüte

Granny Square : große 3D Blume 

Mit Häkelanleitung


Entdecke die Vielseitigkeit des Granny Squares: Von Decken bis hin zu Modischer Kleidung

Granny Square ist einfach fantastisch, oder? Es ist unglaublich, wie vielseitig dieses kleine Häkelmuster sein kann. Du kannst damit nicht nur gemütliche Decken, Wolldecken oder Patchworkdecken zaubern, sondern auch deine Tischdekoration aufpeppen – denk an Tischdecken oder Tischläufer im angesagten Granny Square Design.

Aber das ist noch nicht alles! Granny Squares sind auch perfekt, um modische Kleidungsstücke zu kreieren. Stell dir vor: Boleros, Tops, Cardigans, Mäntel, Kleider, Röcke – und ja, sogar Hosen im angesagten Retro-Stil der 60er Jahre kannst du damit häkeln!

Mit Granny Squares ist wirklich fast alles möglich. Ob du nun ein gemütliches Zuhause oder einen individuellen Look kreieren möchtest, dieses vielseitige Muster hat dich abgedeckt. Also schnapp dir deine Häkelnadel und lass deiner Kreativität freien Lauf!


Granny Square mit großer 3D-Blüte häkeln: Ein Blickfang für jedes Projekt

Wenn du bereits von der Vielseitigkeit des Granny Squares begeistert bist, dann wirst du das Granny Square mit einer großen 3D-Blüte lieben! Dieses besondere Design bringt eine zusätzliche Dimension und Textur in deine Häkelprojekte und macht sie zu echten Hinguckern.

Warum eine 3D-Blüte?

Eine 3D-Blüte verleiht deinem Granny Square nicht nur visuelles Interesse, sondern auch eine einzigartige Haptik. Die erhabenen Blütenblätter schaffen Tiefe und Bewegung, die besonders in Decken, Kissen oder als dekorative Akzente in Kleidung zur Geltung kommen.

Vielseitige Einsatzmöglichkeiten

Wie bereits erwähnt, können Granny Squares in einer Vielzahl von Projekten verwendet werden. Mit einer 3D-Blüte kannst du deine Kreationen noch weiter aufwerten:

  • Kuschelige Decken: Füge einige Granny Squares mit 3D-Blüten in deine Decke ein, um einen interessanten Mix aus flachen und erhabenen Mustern zu schaffen.
  • Modische Kleidung: Gestalte auffällige Cardigans, Boleros oder sogar Kleider, die durch die 3D-Blüten zu einzigartigen Fashion-Statements werden.
  • Dekorative Heimtextilien: Verwende die 3D-Blüten-Granny Squares für Kissenbezüge oder als Akzente auf Tischdecken und Tischläufern.

Egal, ob du ein Häkelanfänger oder ein erfahrener Profi bist, meine Anleitung ist für alle zugänglich. Mit ein wenig Geduld und Kreativität kannst du deine eigenen Kunstwerke schaffen und deine Häkelkünste verbessern.

Fazit

Das Granny Square mit großer 3D-Blüte ist mehr als nur ein Häkelmuster – es ist ein vielseitiges und kreatives Werkzeug, das dir hilft, beeindruckende und funktionale Projekte zu gestalten. Tauche ein in die Welt des 3D-Häkelns und entdecke, wie viel Spaß es bringt, deine eigenen modischen und dekorativen Stücke zu kreieren.

Folge meinem Blog für weitere Häkelanleitungen und Tipps! Hinterlasse gerne deine Kommentare und teile deine Erfahrungen mit dieser Häkelarbeit. Dein Feedback ist mir wichtig und hilft, den Blog weiter zu verbessern. Vielen Dank für deine Unterstützung und viel Spaß beim Häkeln!

Häkelanleitungen nach diesem Beitrag.

85. Schlüsselanhänger: Maus

Schlüsselanhänger: Maus mit Häkelanleitung Ein kleiner Begleiter mit Herz – Mein gehäkelter Schlüsselanhänger Manchmal sind es die kleinen D...